Similar as horror genre and film noir sub-genre editing, the purpose is again to be able to use various editing techniques that can denote the specific genre. This time I tried to make a romance genre using the same footage from continuity editing.
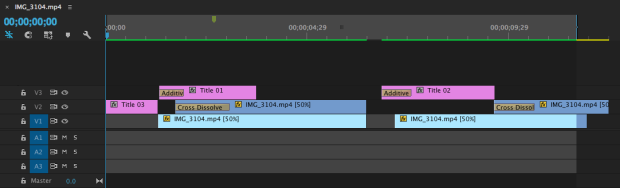
Timeline Sequence
This time my editing is just a simple editing with mixed up of video transition, audio transition, slow motion and different audio level.
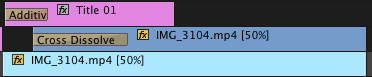
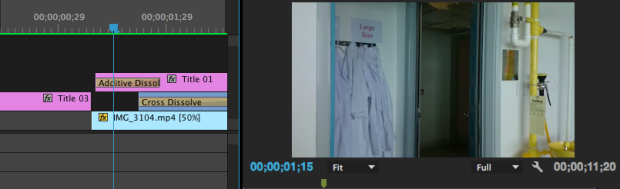
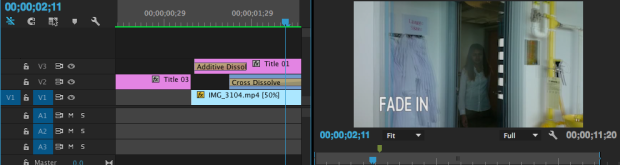
I used additive dissolve in between the shots in order to show that time is moving on while the character is cleaning up her locker. The purpose is also to match up two different perspectives and alternate them, in order to make it alternating smoothly, I used dissolve transition where it helps two different perspectives are connected.
Video Transition
Audio transition that has been used is exponential fade only. This has been excessively used for my audio because every time there is a diegetic sound I tend to slower down the volume of non-diegetic sound. I can’t slower down the sound abruptly. Therefore, I put exponential fade transition to slow down the volume smoothly. Then, I changed the level volume of the non-diegetic sound to -10.0dB. It helps the audience to hear the conversation between characters clearly.
Audio Transition
Before
After
I even slowed down the speed of the video from 100% to 50%. Since this isn’t a horror or action films that needs fast-pace editing to boost up the intensity, it would be the opposite for romance genre. The slow-pace editing emphasise uncontrollable emotions between the characters.
The parts where I reduced the speed:
Problems with this editing:
The background music sound is a bit off. I should have used soft pop music in order to conform the codes and conventions of romance genre instead of using techno music. This non-diegetic song doesn’t fully bring out the romantic atmosphere. The sequence of the video also doesn’t have any elements that related to romance but I still managed to maintain this genre with high key lighting.
Since this is just for practice editing regardless the film sequence, I would come out with better storyline that would match up with the romance genre next time. I will also choose the most suitable non-diegetic song for my main production that helps to bring out the atmosphere.
Reflection – First Version: I chose film noir as one of the genre editing technique so that I can practice with different kind of effects needed to make the storyline depict the genre. For the first version, I simply put up the footage together and put the black and white effect. For the first two footage, I just practicing by putting Noise HLS as a video effects in order to bring out the grain editing thus applying to the codes and conventions of film noir.
Timeline Sequence
Noise HLS used to bring out the grain editing style.
The parts where I used Noise HLS:
Black & White Video Effects
For the audio transitions I used Constant Power and Exponential Fade. These transitions have been used in order to change the audio level of non-diegetic sound smoothly. I also used fast paced non-diegetic sound for the background music.
But then, I just realised I actually don’t fully understand how film noir editing supposed to be. I didn’t really applying to the codes and conventions of film noir for the first version. This is very unconventional editing of film noir. Hence, I decided to make the second version and try my best to apply the codes and conventions of film noir.
Second Version
Reflection Second Version: This is the most challenging part where I need to match up the lighting effects. I modified mostly everything from the first version including the lighting effects and the background music used.
Timeline Sequence
These are the parts where I used Noise HLS with low key lighting.
The lighting changed to very low key lighting or chiaroscuro lighting. This lighting used to make a location or character seem very dramatic and unusual. There are four main effects that I used in order to bring out the lighting effects perfectly conforming to film noir genre. The four main effects including Black & White, Brightness & Contrast, ProcAmp and Lighting Effects.
Four main things needed.
For the Lighting Effects, I used either omni or spotlight as a light type in order to make the character’s face brighter but the character’s background darker. Sometimes, I used both of omni and spotlight simultaneously. For the below footage, I used Omni as a light type. I moved the position of omni on the character’s face so that her face look brighter while I changed the background. I also set the size of the omni by changing the major and minor radius. I changed the brightness and contrast making it looks darker. The brightness and contrast depending on the natural lighting of the video. For the whole effects of lighting are the fundamental thing that signifies film noir.
Other example where I used 4 main components creating the low key lighting:
I have also learnt how to make the omni and spotlight lighting moved following the characters. This is something new for me. I’ve never thought that it would be this is easy even though this technique requires precise and keen eyesight as well as high patience. I have neither of them. Keen eyesight? I’m wearing glasses. High patience? Sometimes I have, most of the time I don’t. I clicked on the toggle button of the centre that’s when I marked first position of omni and spotlight. This will be appeared as key frame indicating where and where the lighting is appearing. The second key frame, I simply move the position of the centre either to the right or left, upwards or downwards. Same goes for the next key frames. When I have settled, the lighting will gradually follows the characters moves. This is also the part where I used both omni and spotlight lighting at the same time.
I changed the background music to something that is slow pace music and it is a bit intense in order to conforming the codes and conventions of film noir. Sound effects are often used in film noir editing to reflect the atmosphere of the location. Again I conventionally used constant power when I tried to change the level of the volume for non-diegetic sound.
Problems encountered with second version: The lighting is a bit inconsistent. Some parts look brighter which doesn’t rely conforming that’s a film noir. I would try my best to do this editing precisely and preparing to have high patience if I ever come cross editing film noir sub-genre again.
Will you consider using this technique in your coursework?
I am most likely not going to use this technique for my coursework production since my production genre is romantic comedy. These two genres are totally the opposite. I need high key lighting or natural lighting to bring out the romance or comedic atmosphere, rarely use low key lighting.
Reflection: Disappearing task can be also called as fade in and fade out editing. This is where to show that the character has gone missing (fade out) or the character suddenly appears (fade in). A fade usually occurs as the video turns to a single colour such as black or white, the most conventional colour for fade editing. Fade in generally use at the start of a video and fade out uses at the end of the video. While making this video, it helps me to improve my skills as well as challenging my patience during the editing session.
Filming session:
I filmed the footage using my own mobile phone which is Sony Xperia Z2. At first, I failed to have static position when I was filming. I accidentally moved my hand and I lost the consistency where the camera needs to be placed at the same position so that the editing will work. I managed to finish the filming session in second take even though the video is a bit shaking.
Editing Session:
Here it comes, the most challenging part and almost kill me and snatch away my patience. It was so hard to match the two clips especially matching the door closing part. First, I cut the video split into two. First part is where the door closing and the second part is where character gets into the room. I layered the videos on timeline sequence like this:
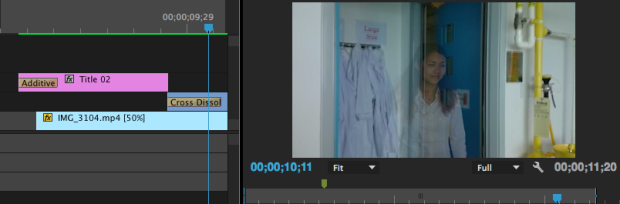
Fade In:
I put the door closing part underneath the part where character gets in the room on the timeline sequence. The part where character gets in was placed a bit to the right of the door closing part like this:
I need to sort out where the matching part of closing door. Then, I put one of the video transitions which is cross dissolve on the video of the character gets in so that there will be invisible sudden appearance of the character creating distortion. This editing mostly about how to make appearances of the ghost. For the fade in, this helps creating an illusion of a ghost gradually appearing in my video.
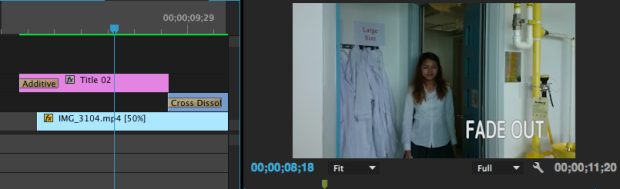
Fade Out:
This time I swap it around the part where character gets in placed underneath the part where door is closing. This time the door closing part located to the right of the character gets in part like this:
Same thing I need to sort out the timing of closing door and match it. However, I put cross dissolve on the door closing footage signifying the ghost is invisibly disappearing. This connotes that the ghost has gone missing.
Problems Occur: The footage is shaking if I use handheld method. Next time, it would be better if I utilising tripod which helps the consistency of camera’s position. There is also a mistake during the filming. The part where character is opening the door was fine but the part where door opening and closing by itself was wrong. I only have the part that door is closing by itself, I don’t have the clip of door is opening by itself. Due to that mistake I had difficulties in matching the clips. Next time, I better remind myself not to repeat the same mistake ever again!
Will I ever used these techniques in my coursework?
Yes! I definitely need these techniques since my production is about a soul can go through things such as walls or doors. This soul is invisible to other people but there is one person who can see him. This disappearance task would be a big help in my production coursework. Definitely!
The purpose of making this video is to become increasingly knowledgeable about various editing techniques that I can utilise in order to make the depict a variety of genres. To achieve this, I modified the same footage from my continuity editing video to denote the horror genre.
The whole timeline sequence
I used ‘Colour Balance’ to change the video, giving it a redish tone. This helps the audience decipher the horror genre as I have applied a conventional colour of the horror genre. I used different aspects of ‘Colour Balance’ in each clip to match them since they denote different light shades. Even though the lighting is still not matching, I’ll try to improve more in matching the filter.
Different brightness and contrast tones were used, which depended on the natural lighting of my shot, as well as dulling the bright lighting so that I can bring out the eeriness.
I even put gaps in between to create a bit of suspense which conforms to the codes and conventions.
I intend to reduce the speed and increase the duration of each action of the footage making it in slow motion with regard to help the clip looks more suspenseful.
Before
After
Originally, the characters in the running scene were actually late to class but in this scene it can be described as if they are being chased. They end up somewhere dark, which also applies to the conventions of the horror genre. The use of non-diegetic sound helps to set the mood of a horror film. I put the exponential fade at the end of the sound to make the video finishes smoothly.
Here are the mistakes that I should have avoided. Using too much colour editing makes it too ‘heavy’ for the audience to accept and sometimes it looks unnatural. Some scenes have different natural lighting, applying all the scenes to the same colour balance wouldn’t make the scenes match each other. For example, between these two scenes, the filter is not matched at all.
I should have carefully matched the editing colour to make it look more realistic!
Will you consider using these techniques in your coursework?
This is just for practice, I may not use them in my coursework since my coursework genre is far from a horror film, but the skills definitely will help me in the future if I ever create a horror genre video.
The purpose of this video is to show that I am able to depict a split screen editing technique using the same footage from my Continuity Video. This task is to demonstrate how I am strengthening and improving my skills in editing. Split screen editing helps when the producer wants to show a variety of pictures and/or video simultaneously.
I managed to depict the split screen technique successfully, even if only for a short time. I overlayed the footage on top of each other so that they will appear at the same time. I simply reduced the scale of the video to 50% and then I tried to compose them at the right place by changing the position number to the left and right, up and down. The number right beside ‘Position’ is for making the video move to the left or right. By decreasing the number, the video will move to the right side of the screen and vice versa.
For the bottom footage
For the top footage
However, it would have looked better if I included an explicit borderline between the different clips in order to make the split screen obvious. Also, I should have demonstrated more split screen examples in order to become more familiar with it and show that I am getting better using this editing skill.
Second Version
For the second version I changed the part where two same person is talking since this clip just doesn’t make sense and so I put another character is talking as if the characters are having a conversation.
Will you consider using this technique in you coursework?
I am most likely gonna use this technique for my coursework showing that my main character’s daily activities.
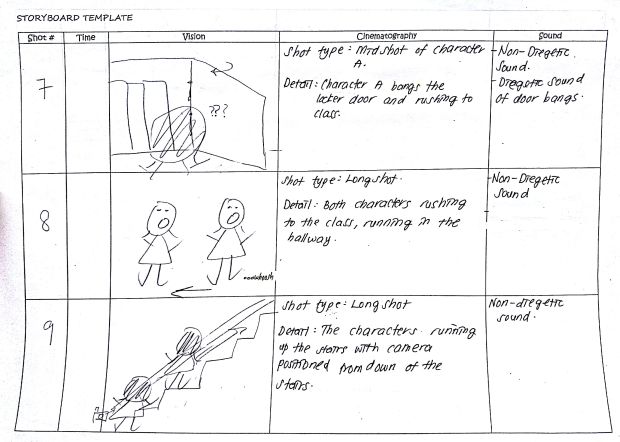
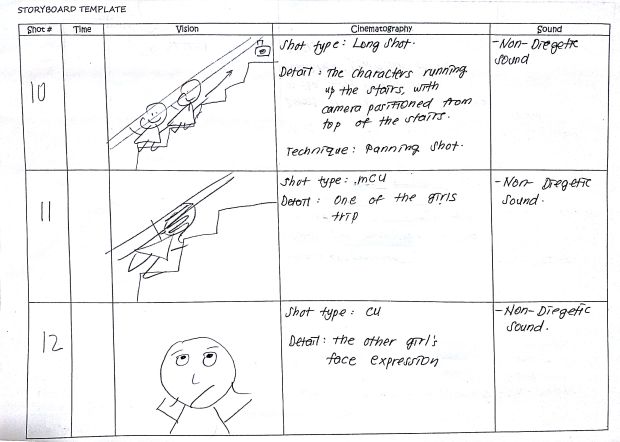
This is the storyboard of my continuity editing sequence:
Reflection:
Continuity Editing is an editing style that aims to present the text in a chronological manner to emphasise the real-time movement of the narrative and to create a sense of realism for the audience by giving the impression of continuous editing.
The purpose for this preliminary task is to familiarise myself with an array of shots required in order to meet the requirements of filming a continuity sequence such as match on action, 180 degree rule and shot reverse shot. I learnt how to shoot the video using the cinematography require to produce a continuity editing sequence. I filmed using school camera which is Panasonic AG-HMC153MC.
Match On Action– This is one of the film editing techniques needed for continuity editing where the first shot of an action cuts to another shot of the action and these shots need to match in succession. Match on action tends to give the impression of continuous time when watching an edited film. This is the part where I use match on action:
I used a long shot and mid-long shot so that the audience is able to see the action within the mise-en-scene. I realised that most of the match on action editing technique uses long shots of an object then cuts to the close-up shot continuing the action from the first shot. I chose to subvert the CU because the above shots depict a two-shot moving clip.
180 Degree Rule – This film technique is a fundamental guideline where the camera position needs to be within a field of 180 degrees when the characters are having a conversation through the same left-right relationship to each other. The first character is composed frame right of the second character; the composition of the second character is always frame left of the first. Cut together on a timeline, this editing technique is used in order to avoid the audience getting confused and disorientated. The part where I use 180-degree rule is:
Shot Reverse Shot – Again this is one of the continuity techniques conventionally used when the characters are having a conversation. This film editing technique basically shows one of the character’s perspective looking at the other character. This is the part where I use an insert with the short reverse shot of the characters talking; the insert depicts a close up of the school bell when it rings.
Sequence Reflection – I purposely left the footage to be super bright i.e. high-key lighting, so that will heighten the comedic atmosphere of this sequence. This connotes that my sequence applies to the codes and conventions of the comedy genre. I made some mistakes during filming where my camera was in the wrong position. At first my camera position was here:
but then I moved and filmed from a different position:
This is because the part where the camera was inside the locker is on the right-hand side and when I filmed from outside of the locker, it should have been the opposite.
Also, I need to focus on the lighting between the two scenes. These scenes have very inconsistent lighting as if they are in totally different places, which could make the audience confused.
Overall, I learnt how the camera should have been positioned in order to apply it to the specific film editing techniques required.
Will you consider using these techniques in your coursework?
I may consider using the techniques in my trailer, especially the shot reverse shot technique since that is a convention of editing when someone is having a conversation. My coursework genre is ‘RomCom’ which signifies that I would have quite a number of scenes where the characters are having conversation.